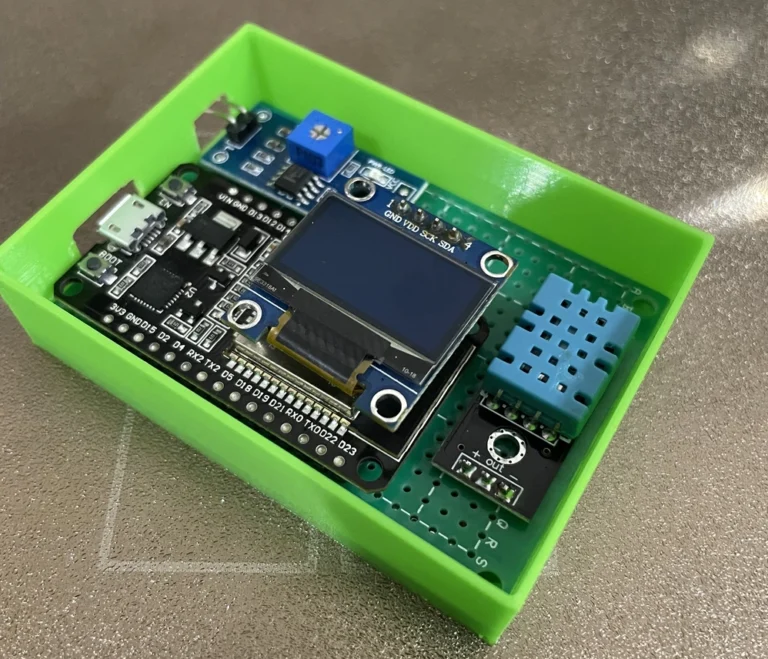
Smart Plant Monitoring System
Shopping Cart
No products in the cart.
Introduction
With the growing interest in smart gardening and plant care, having a reliable system to monitor environmental conditions can greatly enhance plant health and growth. This project aims to develop a Smart Plant Monitoring System using the ESP32-C3 Xiao, a DHT11 temperature and humidity sensor, a soil moisture sensor, and an SSD1306 OLED display. This system provides real-time monitoring of the environmental conditions crucial for plant health, such as temperature, humidity, and soil moisture levels.
Components
- ESP32-C3 Xiao:
- The ESP32-C3 Xiao is a compact microcontroller with built-in Wi-Fi and Bluetooth capabilities, serving as the central processing unit for the project.
- DHT11 Sensor:
- The DHT11 sensor measures temperature and humidity, providing essential data for monitoring the plant’s environment.
- Soil Moisture Sensor:
- The soil moisture sensor detects the moisture level in the soil, helping to ensure that plants receive the right amount of water.
- SSD1306 OLED Display:
- The OLED display provides a clear and easy-to-read interface for viewing real-time data from the sensors.
Components
- Environmental Monitoring: The system continuously monitors temperature, humidity, and soil moisture levels using the DHT11 and soil moisture sensors. This data is processed by the ESP32-C3 Xiao and displayed on the OLED screen.
- Data Display: The SSD1306 OLED display shows real-time sensor data, allowing users to easily monitor the environmental conditions affecting their plants.
- User Alerts: Based on the sensor data, the system can trigger alerts (such as on-screen notifications or potential future integration with a mobile app) when certain thresholds are exceeded, indicating when the plant needs attention.
- Connectivity: With the built-in Wi-Fi capabilities of the ESP32-C3 Xiao, the system can be connected to a network, enabling remote monitoring and potential integration with IoT platforms for advanced features.
Detailed Description
- Sensor Integration:
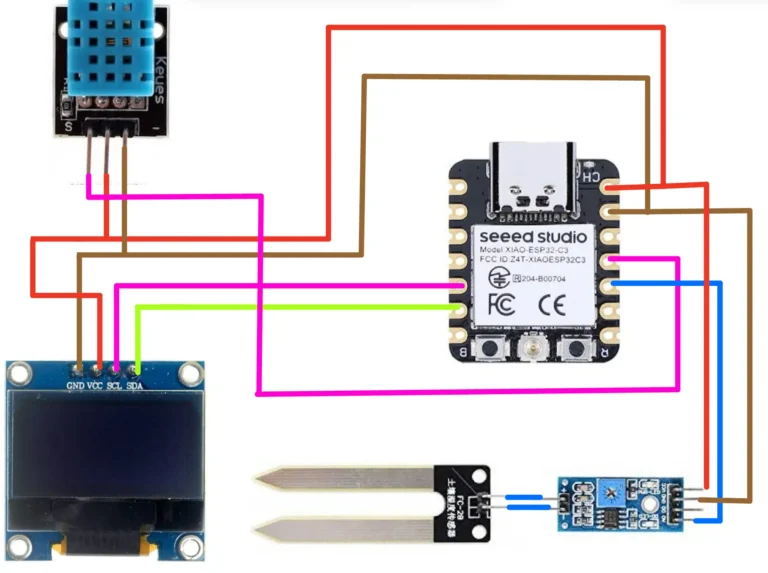
- Connect the DHT11 sensor and the soil moisture sensor to the ESP32-C3 Xiao. The sensors will communicate with the microcontroller, sending real-time data on temperature, humidity, and soil moisture.
- Data Processing:
- The ESP32-C3 Xiao processes the raw data from the sensors, converting it into readable values for temperature, humidity, and soil moisture. This data is then formatted for display purposes.
- OLED Display Interface:
- The processed data is sent to the SSD1306 OLED display. The display will be updated in real-time to show the current environmental conditions, providing users with immediate feedback on the plant’s health.
- User Alerts:
- Implement logic within the ESP32-C3 Xiao to trigger alerts when the temperature, humidity, or soil moisture levels go beyond predefined thresholds. These alerts can be displayed on the OLED screen or sent to a connected mobile device for remote notifications.
- Network Connectivity:
- Configure the ESP32-C3 Xiao to connect to a Wi-Fi network. This enables remote access to the system, allowing users to monitor and control the environment from a web interface or a mobile app, and potentially integrate with other IoT platforms.
Here’s an example of how to set up your ESP32-C3 Xiao to work with the DHT11 sensor, a soil moisture sensor, and an SSD1306 OLED display. The code will read environmental data from the sensors and display it on the OLED.
- Sensor Integration:
Connection Diagram

Arduino Code
You’ll need the following libraries:
Adafruit_SensorDHTAdafruit_SSD1306Adafruit_GFXWire
				#include <Wire.h>
#include <Adafruit_SSD1306.h>
#include <Adafruit_GFX.h>
#include <DHT.h>

// Define sensor and display pins
#define DHTPIN 2
#define DHTTYPE DHT11
#define MOISTURE_SENSOR_PIN A0
#define SCREEN_WIDTH 128
#define SCREEN_HEIGHT 64
#define OLED_RESET    -1

// Initialize DHT sensor
DHT dht(DHTPIN, DHTTYPE);

// Initialize OLED display
Adafruit_SSD1306 display(SCREEN_WIDTH, SCREEN_HEIGHT, &Wire, OLED_RESET);

void setup() {
  // Start serial communication
  Serial.begin(115200);

  // Initialize the DHT sensor
  dht.begin();

  // Initialize the OLED display
  if (!display.begin(SSD1306_I2C_ADDRESS, OLED_RESET)) {
    Serial.println(F("SSD1306 allocation failed"));
    for (;;);
  }
  display.display();
  delay(2000);
  display.clearDisplay();

  // Initialize moisture sensor pin
  pinMode(MOISTURE_SENSOR_PIN, INPUT);
}

void loop() {
  // Read temperature and humidity from DHT11 sensor
  float temperature = dht.readTemperature();
  float humidity = dht.readHumidity();

  // Read soil moisture level
  int moistureLevel = analogRead(MOISTURE_SENSOR_PIN);
  moistureLevel = map(moistureLevel, 1023, 0, 0, 100); // Convert to percentage

  // Check if any reads failed and exit early (to try again).
  if (isnan(temperature) || isnan(humidity)) {
    Serial.println(F("Failed to read from DHT sensor!"));
    return;
  }

  // Display data on the OLED screen
  display.clearDisplay();
  display.setTextSize(1);
  display.setTextColor(SSD1306_WHITE);
  display.setCursor(0, 0);
  display.print("Temp: ");
  display.print(temperature);
  display.println(" *C");

  display.print("Humidity: ");
  display.print(humidity);
  display.println(" %");

  display.print("Soil Moisture: ");
  display.print(moistureLevel);
  display.println(" %");

  display.display();

  // Print data to Serial Monitor
  Serial.print("Temperature: ");
  Serial.print(temperature);
  Serial.println(" *C");

  Serial.print("Humidity: ");
  Serial.print(humidity);
  Serial.println(" %");

  Serial.print("Soil Moisture: ");
  Serial.print(moistureLevel);
  Serial.println(" %");

  // Wait for a second before the next loop
  delay(1000);
}
Explanation
- Setup Function:
- Initializes serial communication, the DHT11 sensor, the OLED display, and the soil moisture sensor pin.
- Loop Function:
- Reads temperature and humidity from the DHT11 sensor.
- Reads soil moisture level from the moisture sensor.
- Maps the soil moisture reading to a percentage value.
- Checks for sensor read failures and exits early if any are detected.
- Displays the sensor data on the OLED screen.
- Prints the sensor data to the Serial Monitor.
- Waits for a second before the next loop.
Customization
You can customize the thresholds for alerts or add additional functionality such as Wi-Fi connectivity for remote monitoring. For instance, integrating with a web server or a mobile app for remote access can enhance the system’s capabilities.

Conclusion
The Smart Plant Monitoring System offers a versatile and reliable solution for plant care, providing real-time monitoring of essential environmental parameters. By integrating sensors, real-time data display, and connectivity features, it enhances the ability to maintain optimal conditions for plant growth. Whether for home gardening enthusiasts or professional horticulturists, this project showcases the capabilities of modern IoT technology in improving plant health and growth.


